
HOW TO Handmake
Holiday Cards
Starting With Halloween!
I know there may be many of you that don't send Halloween Cards or celebrate this Halloween. Well, it is my favorite HOLIDAY! The costumes, the fun children have (big and small) and the imagination that goes wild with being scared makes me shiver! Maybe Jen will let me read for you and show you my pet vulture! I have been a witch for 32 years (my true identity!) I really like spooky movies too!
I am focusing on the techniques, tips, and tricks Jen shows us in her LIVE Friday Freeplay tutorial on September 21, 2018.
The first trick, right off the bat (pun intended!), is to show viewers how to stamp while easily masking part of the image! Use a piece of Post It paper, attach the sticky onto the part of the stamp you don't want to see. Ink the stamp, remove the sticky note and then stamp the image!
 |
| Cover the web with the sticky paper, ink the stamp, remove the paper, stamp your image |
 |
| Ta-Da! Spiders without webbing! |
Batty Bat Card
The first tip for the bat card is putting a piece of paper under the cardstock you will stamp on. You will be able to stamp your image off the page without worrying about spreading the ink onto your desk or smudging your paper.
A stamped bat was scattered over a 4.25"x 5.5" Neenah 110# Exact Index piece of cardstock.
The first technique is turning a water-based marker into watercolor. Scribble the marker across an acrylic block and add a bit of water from the Rinse Well, turns this medium into paint.
A stamped bat was scattered over a 4.25"x 5.5" Neenah 110# Exact Index piece of cardstock.
 |
| Choosing the bat! Cute! |
 |
| Stamp off the edge to make it look like background paper |
 |
| Marker to paint Technique |
 |
| A Rinse Well instantly gives you clean water when you need it |
This technique shows that you can choose where the light source may be coming from. To make a shadow, paint a darker hue along the opposite side of the image.
 |
| From the watercolor palette to the shadow side of the bat |
The marker will not spread so easily as the watered down ink does. A line along that dark background, next to the bat, would really make them pop! Tip: When you put the marker direct to paper, your shadow will be dark. If you try to spread it with water, it could spread the dark color too much and risk pilling the paper if it gets too wet.
Trick: Be careful with this! This is not watercolor paper and they are watercolor markers. They are water-based so they will spread. All you need is a VERY thin line to accent.
 |
| Artiste Watercolor Dual Tip Markers, 36-Pack |
 |
| The more water, the less color there will be! Look how he POPS! |
 |
| Look what a thin line next to the bat can do! |
The damp cardstock is trimmed and is slowly dried with Ranger´s Heat It Tool. The heat will make the cardstock curl. Trick: Just turn it over to straighten. As the piece of paper heats, it will also stiffen.
 |
| Paper curling as it dries |
Technique: When the paper is stiff, it is the perfect time to distress the edges. A Distress tool is used. It scratches and roughens the edges of the cardstock. It´s easier to use when the cardstock is firmer. TIP: The edge of a pair of scissors will work to distress the edges also.
 |
| TONIC STUDIOS Tim Holtz Paper Distresser |
Technique: A homemade wobble can be created with two pieces of paper! Another image of a bat is created on another piece of paper. It is punched out and ready to be glued to the other end of the homemade wobble.
 |
| CLICK here to go to the tutorial about making exactly the same homemade wobble! |
Watch it WOBBLE!!
The next trick is a tricky one! Attach your bat-filled cardstock to the white card base. Use a black marker and draw around the edge of the stamped cardstock. This gives the illusion that the cardstock was mounted on black paper before attaching it to the base. This cuts down the thickness which is nice for mailing.
 |
| Carefully draw a black line around the stamped cardstock |
A stamp Shammy by Lawn Fawn is used to clean the bat stamp. This neat cleaner just needs to be damp with clean water! Rinse and let dry unfolded when you are done for the day. It may get stained but that isn't a problem. It can be used many, many times before replacing! And it won´t leave fibers on your stamps!
 |
| Lawn Fawn Stamp Shammy |
The Amazing Mummy
This next technique is fun! Scribble red marker onto an acrylic block. Add some water with a paintbrush. Now, with paint on the brush, tap the brush over your finger (make sure it´s over your piece of cardstock!) This is called spattering.
 |
| Spattering on your background |
The image of a mummy will be added to this card. It will be layered onto a black circle so it stands out. Technique: Cut a dark or black piece of cardstock into a similar shape and larger, to give the mummy a frame. But it needs something. Orange ribbon is the choice! Tip: If you can´t make a bow, then don´t make a bow!
Cut a piece of ribbon a little longer than twice the Diameter of the black circle. Fold it in half with a small loop at the top. Have the loop hang over one side and the tails hang out the other side of the black circle. Trick: Now just staple!
Cut a piece of ribbon a little longer than twice the Diameter of the black circle. Fold it in half with a small loop at the top. Have the loop hang over one side and the tails hang out the other side of the black circle. Trick: Now just staple!
 |
| Staple in the center of the black circle |
The staple will be hidden by the image!
Use foam tape to the back of the circle, to pop the whole embellishment up on the card!
Spot, Spazz, and Spunky Spiders
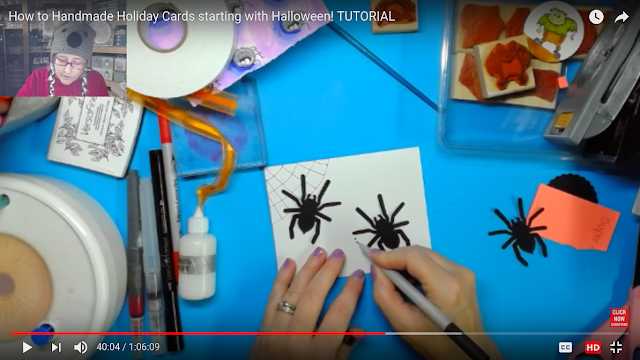
The next card idea has creepy spiders added to it! Trick: The paper punched spiders legs are slightly curled down and the body is popped up with foam tape. This gives the illusion that the spiders are crawling across the paper!
Use whatever punch you have
Technique: Don´t be afraid to doodle on the front of your card! Take a small tipped marker and draw a simple web in one corner and tracks coming from the other spider. (Shiver!)

Doodling with spiders! Eeeeek!
This technique is really cool!!
Use a piece of white core paper. This is a paper that is colored on one side but white on the other. Cut a 5¨x 3.75¨ piece of this paper. We used black paper with a white back.
Place your paper, face up, into an embossing folder of your choice. Use the correct sandwich for the machine you're using and run it through the die cutter. (Cuttlebug, Big Shot, Gemini, etc.) Take a cheap, small-grained piece of sandpaper or a fingernail file and scratch across the colored surface of that piece of paper! It brings through the other color like magic!
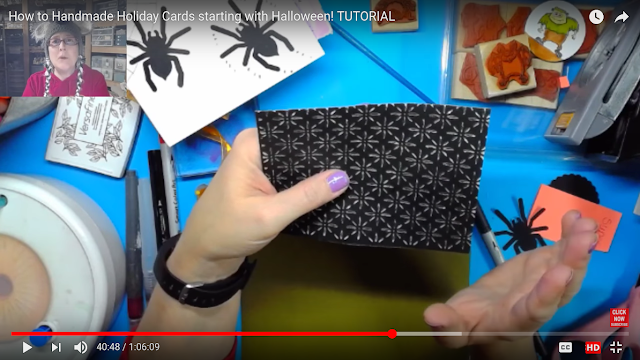
Embossed and filed black paper
Attach your embossed paper to your card base. Use the trick you learned on the first card and outline this one with an orange pen!
Punch or die cut a circle large enough to fit around the image of the spider. This circle should be a different color than the black spider and background. So pea green was chosen!
Technique: Lightly spray the circle with water and scrunch it into a ball. (Tip: Use a spray like a glitter spray, mica spray or shimmer spray!) Open and slowly dry it with the Heat It Tool.
The next card idea has creepy spiders added to it! Trick: The paper punched spiders legs are slightly curled down and the body is popped up with foam tape. This gives the illusion that the spiders are crawling across the paper!
 |
| Use whatever punch you have |
Technique: Don´t be afraid to doodle on the front of your card! Take a small tipped marker and draw a simple web in one corner and tracks coming from the other spider. (Shiver!)
 |
| Doodling with spiders! Eeeeek! |
This technique is really cool!!
 |
| Embossed and filed black paper |
Attach your embossed paper to your card base. Use the trick you learned on the first card and outline this one with an orange pen!
Technique: Lightly spray the circle with water and scrunch it into a ball. (Tip: Use a spray like a glitter spray, mica spray or shimmer spray!) Open and slowly dry it with the Heat It Tool.
 |
| Drying the scrunched circle |
Once dry, pop up your spider like you did the others and attach it to your circle, and attach your circle on top of your embossed paper!
 |
| Ranger Heat It Tool |
WOW! That embossed paper makes that spider stand out!
Gory Ghoul
This simple card features a silly little ghoul. He has been colored, shaded, and circle punched ready to be the focal point on a card.
Technique: This time a background stamp will be used. Choose any one that you have. (Tip: A background stamp will put a design all across your paper. It´s usually bigger than an A2 card, 4.25¨x 5.5¨.) Using a permanent ink like Versafine, ink up your stamp.
 |
| Using a background Stamp |
Tip: The easiest way to do this is to lay your stamp, ink side up, onto your craft mat. Place the cardstock on the top. Hold it still, rub firmly across the paper. Get the whole thing!
Pull it off and there you have your stamped image! Tip: To dry your stamped image quickly, use a homemade embossing buddy! The details are found right here!
Add a little color to your background using the marker technique learned in the first card.
Tip: Use more than one color if you wish. Remember to leave white space. It balances out some of the colors in your project.
Here´s a trick you learned, add some ribbon to the back of the circle with the ghoul as the focal point. Tip: To make it stand out more, color around the edge of the shape, before or after adding the ribbons. That is another trick that has been shared.
Draw own element, super easy one for kids!
 |
| Watercoloring with markers |
Here´s a trick you learned, add some ribbon to the back of the circle with the ghoul as the focal point. Tip: To make it stand out more, color around the edge of the shape, before or after adding the ribbons. That is another trick that has been shared.
The Reveal
Use water-based markers to create watercolor paint. Create a shadow. Draw around the edge of the cardstock to create a faux layer. Pop up an embellishment with a homemade wobble!
 |
| the batty bat |
Draw own element, super easy one for kids!
 |
| Spazz and Spunky Spiders |
Create a focal point. Add ribbon to your embellishment. Spray your background either with spray ink or a paintbrush and your paint!
 |
| Amazing Mummy |
 |
| Spot Spider |
Leave white space. Make your own background!
 |
| Gory Ghoul |
And the one that was made before the show! Try Post-It Notes to mask an area you don´t want to be stamped.
 |
| Make a shadow for your image |
I enjoy these type of videos. They fill my head with ideas. I always have my notebook at hand and I think, "I need to use my embossing folders more often!"
To view the whole LIVE video and perhaps catch a few MORE tips or tricks, please click on the photo below!
 |
| Click here to see How To Homemade Holiday Cards starting with Halloween |
This was an excellent basic technique, tips and tricks tutorial. I enjoy the camaraderie between the viewers. Jen is right there to answer questions or to giggle over a viewer's comment!
Check out more 'How To' videos in the Archives or join us Live on Wednesdays at 5pm CST for One in Ten by Jen: In'Jen'uity from Mailbox to Masterpiece. Jen attempts to finish a card in 10 minutes from scraps from the craft desk that viewers send in.
Jen is also LIVE on Friday evenings for Friday Freeplay at 5pm CST also on the Jen Evers YouTube Channel. On Fridays, it's relaxed, fun time as Jen gives tutorials of techniques and trending craft supplies. Recently she has done a series on playing with UTEE (Ultra Thick Embossing Powder), foiling with and without a laminator and making cards with black or dark cardstock!
 |
| Koala T Crafts Facebook Community |
To join our community, please visit the Koala T Crafts Facebook page! All it takes is to answer three simple questions and if you are not a robot or spam, I'm sure you will be able to join!
Add the Facebook Group and the blog into your favorites, jenskoalatcrafts.blogspot.com. is where you will find the blog. Remember koalatcrafts.com if there is something you are looking for, information about the community, and easy access to the Jen Evers YouTube Channel.
 |
| Click here to go to the JEN EVERS YOUTUBE CHANNEL, the home of Koala T Crafts |
Koala T Crafts now offers specials to their Patrons! What´s a Patron?
A Patron is someone that takes that one step further to support Koala T Crafts. It means you support the Facebook Community, you support the Patron Community, you support the Store and the YouTube Channel. Your support means updated software, craft supplies, broadcasting fees and the possibility of expanding Koala T Crafts to do more tutorials, more giveaways, more time for YOU!
It´s just a baby step but it comes with so much! You get the chance to help keep Koala T Crafts moving forward and in return, the benefits are endless!
Every patron in the community is appreciated no matter their pledging ability. The rewards are available to ALL who join, whether you're able to pledge ***$1, $3, $5, $10, $15, $25 or any number in between. THANK YOU!!
Artistically yours,


1. Access to patron only feed
2. Exclusive videos
3. Private Facebook group (challenges and activities!)
4. Random live stream events
5. 10% off in store on all purchases
6. **NEW** Free challenge digital stamp 12 times a year!
7. get a free preview of the crafty items that will be for sale at Koala T Crafts bi-weekly
Garage Sales
8. amazing inspiration from community members
Just come in your pajamas, hang out and have fun!
Remember, great things happen to
those that create!
Artistically yours,


 |
| Koala T Crafts Store koalatcrafts.com |
As always, thank you so very much for the support of the Jen Evers YouTube Channel! She has hit over 15,000 subscribers! Thank you for supporting and caring about the Koala T Crafts Facebook Group, Patreon Group, and the Blog! Please remember that you can always ask questions;
1. On the Facebook page, many in the Community are willing to help you out!
2. Private Message (PM) Jen Evers (Admin.) or Penny Jo Ratcliff (Admin.), Lori Ellen (Blog), Pamela Wilber (Card Swaps) or Susan Baker (Moderator)
3. If you are a Patron of Koala T Crafts, you can post your question and the Patron Community will help happily!
4. Jen Evers is always available at her email address: koalatcrafts@gmail.com
No comments:
Post a Comment