FOLLOW ME HERE!

Tuesday, March 27, 2018

Blending with Tim Holtz Distress Inks

Blending 

with Distress Inks

blend

/blend/
verb
mix a substance  with another substance so that they combine together as a mass 
  • mix thoroughly so that the things mixed cannot be recognized
  • to shade into each other (merge)
Any dye, or water-based, ink is blend-able.  Are you familiar with those triangle makeup sponge wedges? 


I started blending inks with those. Put copy paper or a craft mat down to protect your work surface. Use the larger end of the sponge, tap the ink pad. Start off your project so there won't be any distinct sharp edges, with a light circular motion, rub ink onto your paper. Try at a corner and keep adding ink until you have your desired shade. 

Slowly put another color in the next corner. It's easier to start with colors next to each other on the color wheel. Slowly rub into the original color. As you work back and forth between the two colors the divide becomes less clear. one color has blended into another.

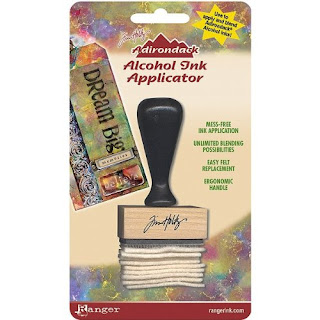
Jen uses a blending tool and peices of felt. The felt lasts longer than the sponge and is easier to move across the paper. She shows a great example of this technique during last week's Friday Free Play! 

 Square Blending tool  Mini Blending Tool

 Jen chose Pumice Stone Distress Ink to blend around the edge of her Petal Card last Friday. Click the picture to see the video!


 The Petal Card


When I saw how Jen had put ink along the edges and stamping with it, I wanted to dig mine out and play with that color!  


Distress inks have been specially formulated to move across the paper easily. Because it's a dye-based ink, it dries quickly. The ink becomes movable again when it comes into contact with any liquid. Putting water droplets onto the inked paper and then blotting them with a dry paper towel, creates patches of removed ink! This technique creates texture and interest to any project!

Distress Ink can be purchased individually in 3" x 3" pads or 

Distress Inks can also come in a mini 1" x 1" pad and there are re-inkers available 
for all 61 colors. The minis are sold in packs of four called kits.

 Mini Ink Pad Kits 1, 2 & 3


Jen uses Neenah Exact Index 110# for all her paper crafting! This card stock is durable, smooth and acid-free. 

 Neenah Exact Index Cardstock


Show the Koala T Crafts your blending work by downloading a picture and description (colors, paper, what will YOU use it for?) to the Koala T Crafts Facebook page! 

Join our community for updates, swaps, events, Amazon craft sales and of course, information about the LIVE YouTube chats with Jen and others weekly!
 Koala T Crafts Facebook page

Good things come to those that create!!  Artistically Yours,


Follow Jen on Social Media!


FACEBOOK: facebook.com/koalatcraft


AFFILIATE DISCLOSURE:

When I need certain supplies I turn to Amazon because they have a great range of supplies, in one place,

that's easy to navigate, and I am able to find what I need with ease. I am part of various affiliate programs

including Amazon – when you click on an affiliate link and then go on to make a purchase, at no cost to you, 

I receive a small commission. I use the money raised towards the cost of running this blog. I hope if you like 

the content of my blog, you will support me by clicking through these links to make your purchases. 

Thank you!
Jen xoxo


Wednesday, March 21, 2018

Gemini: The electric embosser and cutter in one!

Why the Gemini?!?

Gemini;

plural noun, originated 1350-1400 Middle English < Latin, plural of geminus

1. Astronomy, the Twins, a zodiacal constellation between Taurus and Cancer

2. Astrology, the third sign of  the zodiac, a person born under that sign would be around
    May 21st - June 20th

3. Koala T Crafts, twin sisters that drank diet Mt Dew: Code Red on their birthday last year, 
     March 2nd, one suspiciously suggesting to the other that it would taste sweeter 
     with a little rum! (Giggle!)

4. Crafter's Companion,  an innovative tool with a twin 
     function die cutter and embosser!
 the Gemini


Yes, Crafter's Companion, (the company known for Spectrum Noir Markers, Aqua Markers,
AquaBlend Pencils and Sparkle Markers) has created a tool to make crafting, of all sorts, simpler and easier.
  • It has a sleek design and low profile of only 5.6" high!
  • But WAIT, it has a large platform size of 9" x 12 1/2" allowing more versatility.
OH, C'MON, anyone can copy a website or sound like an ad! I have a card making/quilting friend that received a Gemini for Christmas last year. I couldn't wait to be able to use it myself!  The electronic machine is impressive and not one you would want to tote to a crop. It measures 14" wide, nearly 8" deep and weighs over 15 pounds! 


The weight is because of the heavy-duty rollers that press so hard that they can cut up to several layers of fabric (making quilter's drool over the mention of it), vinyl, foil and leather. It also gently cuts the most intricate of dies, can cut all of your dies for a scrapbook page all at once and all I had to do was touch a button. Actually, it has three buttons. The Gemini has a Pause and a Rewind button as well!


 Can you tell I was impressed? I brought items to cut for my own personal use. It is compatible with most dies and embossing folders. The die cuts that also have embossed detail turn out beautifully! I was wondering if I could wait until Christmas?! The only negative thing for me, personally, was its weight. I would have to store it when I wasn't using it which meant moving it back and forth. It's heavier than my hand crank (I am appreciative, I am...) and I just don't have the space to keep it out.  I'm sure others have similar issues. But how can I justify getting it NOW?

Crafter's Companion to the rescue! A 'twin', of sorts...

 Gemini Junior
Introducing the Gemini JUNIOR....all the power and punch of the Original Gemini in a smaller package!  It has a similar size platform as my hand crank, still only 7 1/2" deep, but 10" long and only 10 pounds! (How heavy is that hand crank? A little weight lifting wouldn't hurt me!)  It can still cut through the same thick items and the fanciest of dies. 
***CAUTION: Those of you with steel rule dies, sadly, they do not fit into this machine. 


Well, that is what I found out about the Gemini and a short year later, the Gemini Junior. If you still have questions, you could leave them in the comments below. 

 Crafter's Companion


Remember to join Jen at 5pm CST on Wednesdays for One in Ten, making one card in ten minutes with items sent from a viewer and 5pm CST on Fridays for Free Play Friday where Jen shares a technique or project with tips, tricks and fun! 


Good things come to those that create!  Artistically yours,


 Koala T Crafts Facebook
Click above to join the KTC Facebook Community!


 Koala T Crafts Shop
Click on me to check out the
Original Koala T Crafts Shop!


Join Jen on Social Media!


FACEBOOK: facebook.com/koalatcraft


AFFILIATE DISCLOSURE:
When I need certain supplies I turn to Amazon because they have a great range of supplies, in one place,
that's easy to navigate, and I am able to find what I need with ease. I am part of various affiliate programs
including Amazon – when you click on an affiliate link and then go on to make a purchase, at no cost to you, 
I receive a small commission. I use the money raised towards the cost of running this blog. I hope if you like 
the content of my blog, you will support me by clicking through these links to make your purchases. 
Thank you!
Jen xoxo


Sunday, March 18, 2018

Easy Petal Box Card

PETAL CARD

Friday Free Play March 16, 2018

The Petal Card

WOW! This card would be perfect on a gift!  Easy to make, fun to decorate this Petal Card is unique and really stinkin' cute when it's made with smaller measurements!! But, I'm getting ahead of myself. 

To begin, Jen used a circle cutter and cut four 4" circles. 
 Fiskars Circle Cutter


The circles will be attached to a 4" x 4" white piece of cardstock.


Jen added an extra square of the same pattered paper to cover the bottom once she was done putting the circles onto the square. She shows how to fold, glue and tuck the pieces together to make this petal card. She made it look so easy! 
 Aleene's Original Tacky Glue
Click photo to purchase Aleene's Tacky Glue!


simple! Folding each 'petal' precisely will produce this adorable card.
Jen suggests using double sided pattered card stock or BE CREATIVE and make your own patterned paper. Check out the video to see how Jen reviews the steps, gives inspiration and shares tricks of the trade of which that cute little petal card was created!


 Petal Box Card
Click Jen's photo to go to her video!
WATCH NOW!

On Wednesday and Friday night at 5:00 pm CST, Jen chats live while completing an envelope challenge or teaching her viewers a technique, tip or trick to paper crafting and card making. 


Good things come to those that create! Artistically Yours,


Check out the Koala T Crafts Facebook page! Join our community for updates, swaps, events, Amazon craft sales and of course, information about the LIVE YouTube chats with Jen and others weekly!

Koala T Crafts Facebook Page


Follow Jen on Social Media!


FACEBOOK: facebook.com/koalatcraft


AFFILIATE DISCLOSURE:

When I need certain supplies I turn to Amazon because they have a great range of supplies, in one place,

that's easy to navigate, and I am able to find what I need with ease. I am part of various affiliate programs

including Amazon – when you click on an affiliate link and then go on to make a purchase, at no cost to you, 

I receive a small commission. I use the money raised towards the cost of running this blog. I hope if you like 

the content of my blog, you will support me by clicking through these links to make your purchases. 

Thank you!
Jen xoxo
    

Tuesday, March 13, 2018

Top 10 Card Making Essentials

PAPER CRAFTING 101

Top 10 Card Making Essentials

(for beginners)

We were all beginners at one time. I still have the Santa card I made for my
grandmother when I was in kindergarten. The construction paper is frail,
the cotton ball at the end of his hat is nothing but a few cotton webs. It finally
found a home in an archival page protector. That’s a story for another day.

I'm going to share a list of what I think are the top 10 supplies needed for card making.

There are an abundance of choices for paper, embellishments, trimmers, tools and more!! Probably even items in your home that will work! This list is just a suggestion from my experience, and I hope it will help many of you who are just getting started.

Picture


10.   A Pattern or Your Imagination
9.    Embellishments
8.    Stamps and Ink, Cleaner
CLICK HERE TO LEARN MORE ABOUT INKS!
7.    Patterned paper
6.    Markers, colored pencils, maybe paint, even your child’s
5.    Scissors


4.    Ruler
3.    Adhesives


2.    Paper/ Cardstock
Jen and I agree that this item would be a good investment. Either a
self-healing craft mat or any of the heatproof, waterproof craft mats, like
Ranger’s.  It will protect your work surface from spills, stains, hot glue
and ink dirtiness. There are also glass craft mats made by
EK Success and Tonic as well as others.

Refer to Jen’s video for more ideas!

Please leave any comments or questions below. Feedback and ideas are
welcome! Since this is a No Commitment/No Drama Community, I ask that
your comments be respectful and worded positively.

Good things come to those that Create! Artistically Yours,

Follow Jen on Social Media!

AFFILIATE DISCLOSURE:
When I need certain supplies I turn to Amazon because they have a great range of supplies, in one place,
that's easy to navigate, and I am able to find what I need with ease. I am part of various affiliate programs
including Amazon – when you click on an affiliate link and then go on to make a purchase, at no cost to you, 
I receive a small commission. I use the money raised towards the cost of running this blog. I hope if you like 
the content of my blog, you will support me by clicking through these links to make your purchases. 
Thank you!
Jen xoxo