
Beginner Stamping II: Leaving an Impression
This time we will explore the different ways to use the stamps you have!
You may have some stamps that are clear and, you guessed it, using these blocks to put your stamp on will enable you to place the stamp in the position you would like! All you have to do is take a peek!
Pushin' It
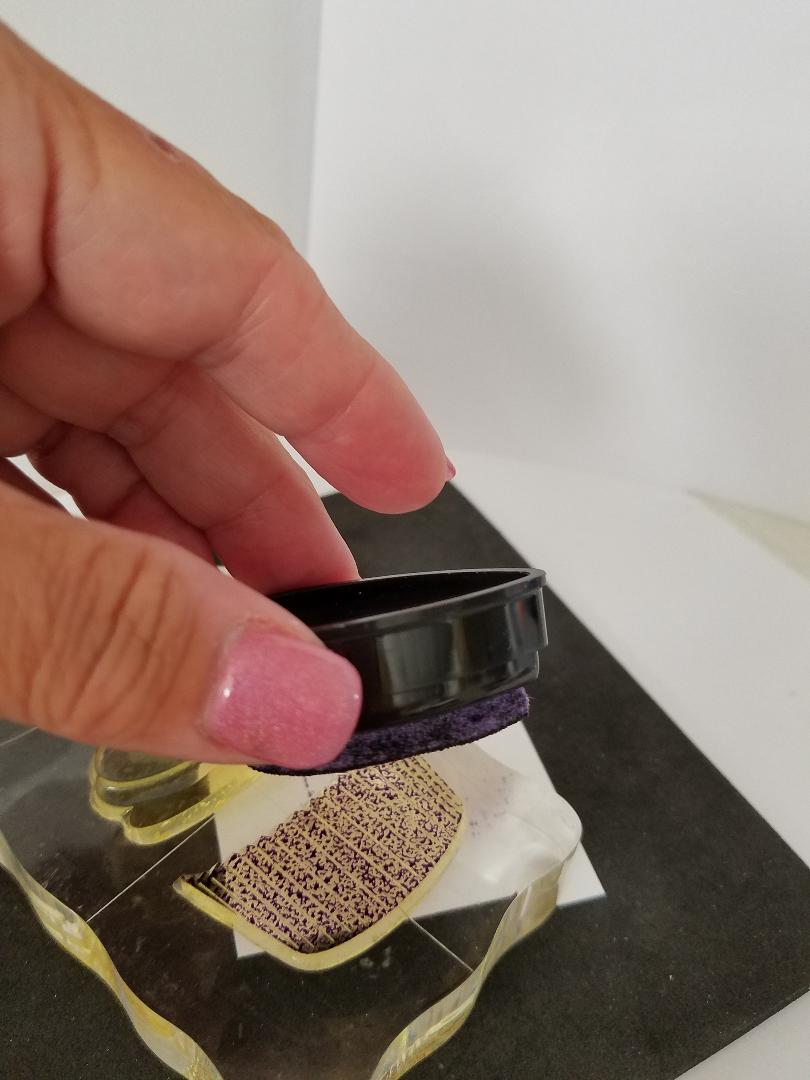
Making good contact between the stamp and paper isn't always easy. Larger stamps sometimes leave sections missed and small sentiments can rock and wiggle. Using a foam pad will help with this.
For clear stamps, this foam pad helps to create perfect images. Just put it under your paper and it will cradle the stamp when you use it.
It cushions the stamp making sure there is even, solid contact. Most often wooden stamps already have a foam cushion between the stamp and block of wood. Even though there is this foam, extra cushion does not hurt.
That's right, its purpose is to aid the crafter in positioning a wood-based rubber stamp.
That wasn't too difficult, was it? But what about other stamps? There are rubber stamps that are not mounted on wood. Some have the cushion and a few don't have anything but the rubber stamp. Those issues will be addressed in another class! However, the stamp may cling to an...
 |
Sizzix Accessory Mini Stamper Secret Weapon |
It cushions the stamp making sure there is even, solid contact. Most often wooden stamps already have a foam cushion between the stamp and block of wood. Even though there is this foam, extra cushion does not hurt.
 |
| The cushion between stamp and wood block |
Straighten Up!
Now you have to put a sentiment under your image. I am sure you tried hard to have the stamp straight and completely stamped. How do you keep the stamp straight? Either you are really good at centering things, straightening and lining them up or you need some help from the Stamp-A-Ma-Jig!
 |
| Celebrate with us! |
 |
| Inkadinkado Stamp-A-Ma-Jig Stamp Positioner |
 |
| Watch 'What is a Stamp-a-ma-Jig with me! |
Acrylic Block!
Acrylic blocks are a rectangle, round or square and are transparent! You can SEE RIGHT THROUGH THEM!


 |
Krystal Acrylic Block Set Of 5 |
You may have some stamps that are clear and, you guessed it, using these blocks to put your stamp on will enable you to place the stamp in the position you would like! All you have to do is take a peek!
 |
| Beautiful Day Stamps by Simon Says Stamp |
For this image, I used Memento, Tuxedo Black Ink, and Versafine, Onyx Black.
If you have a surface you work on that has grids, there is also a set of acrylic blocks that have grids.
 |
Tsukineko VersaFine Pigment Ink, Onyx Black |
If you have a surface you work on that has grids, there is also a set of acrylic blocks that have grids.
 |
| 4 Pieces Stamp Blocks with Grid and Grip, Acrylic Clear Stamping Blocks |
Ink 'em Up!
I did a blog a while back on different types of ink so I don't want to be repetitive. Basically, the most popular types of ink are dye and pigment. Here's a link to that blog!
Ink 101-Helpful Comparisons
An example of a dye ink would be the popular Distress Inks. They are water soluble. They are great for solid or layered stamping. They dry quickly but aren't suitable for water coloring for they will smudge.
Pigment inks are permanent when they dry and take longer to dry than dye ink. Pigment inks have the ability to let you watercolor and use alcohol markers, like Copic, Spectrum Noir or Ohuhu. The image does not change. Pigment inks are also great for heat embossing.

 |
| Copic Classic Markers 36-Piece Basic Set |
 |
| Spectrum Noir Alcohol Markers |
 |
| Ohuhu Alcohol Markers |
Inking is as simple as you think it is. For wooden blocks or acrylic, you will want to hold the stamp and bring the pad to the stamp. This way you can make sure there is a solid, even coverage and there will be little chance of the ink getting on your blocks.
Touch the stamp with the pad firmly but no need to do chest compressions! Make sure the stamp is covered thoroughly. Stamping over the original image is a risky business if your image is too light or missing in a spot.
Make sure you have your stamp mat under your paper. Use your Stamp-a-ma-Jig if you need to. You know, it could be used with the acrylic block also!
There are always exceptions...
Small, tiny stamps like bumble bees, hearts, stars and flowers, similar to the ones in the set below...
...should be taken to the pad. Careful to give even coverage to the whole stamp.
Background stamps are an exception. Picking them up can be awkward and ink-tense! They can just lie there while we ink it up well!
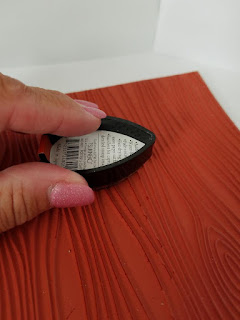
Lay your cardstock on top of your inked background. Lay another piece of cardstock on top of that, hold it steady with your fingers and firmly smooth across the surface of the paper. Be extra careful not to shift it as you remove one and then the stamped cardstock. Your image should turn out beautiful!

...should be taken to the pad. Careful to give even coverage to the whole stamp.
 |
| Stamp to Ink Pad then stamping |

 |
| Hero Arts Mounted Rubber Stamps, 4.5 by 5.75-Inch, Designer Woodgrain |
Lay your cardstock on top of your inked background. Lay another piece of cardstock on top of that, hold it steady with your fingers and firmly smooth across the surface of the paper. Be extra careful not to shift it as you remove one and then the stamped cardstock. Your image should turn out beautiful!
That's it!
Now, you can use those stamps you have been dying to try! Give yourself some room for oopsies! Be kind to yourself. I still smudge ink occasionally or double stamp because my hand bounced. It happens and it's only paper.
A very wise crafter once told me "Just turn the paper over." Wow!
Cleaning 101
Let's go through cleaning your stamps really quick.Most of the time a baby wipe can be used to clean off the majority of the ink. The wipes have a small amount of lanolin in them and this keeps the stamps soft. Baby wipes also have very little alcohol in them. The alcohol can dry out your stamps. Rubber stamps can actually turn white and crack.
HINT: More expensive wipes tend to leave more lint on them.
The quickest and easiest way to clean your acrylic stamps is with warm water and a mild soap. For really stubborn ink, you can also take a soft, old toothbrush and gently scrub the crevices in the image.
HINT: Do not use soap and water with wood-mounted rubber stamps, because it will loosen the adhesive. The quickest and easiest way to clean your wood stamps is with alcohol-free and aloe-free baby wipes.
HINT: Some ink pads can stain your stamps. StazOn®, for example, really does stay on. That’s no big deal—just clean off what you can and let the stamp dry. It won’t ruin your stamp it may just stain it.
Remember to keep your stamp TOOLS clean so you are not transferring ink from one stamp to another stamp or onto your project.
This project has been interesting. I have been stamping for over 20 years and I still learned a few things as I wrote this. One never stops learning.
Watch with me as Jen goes LIVE on Wednesdays at 5:00PM CST for One in Ten by Jen: Card InJENuity from mailbox to masterpiece! where the viewers send in their scraps and challenge Jen to create a card in less than 10 minutes, timed!
Thank you so very much for the support of the Jen Evers Youtube Channel! She has hit over 15,000 subscribers! Thank you for supporting and caring about the Koala T Crafts Facebook Group, Patreon Group, and the Blog! Please remember that you can always ask questions;
1. On the Facebook page, many in the Community are willing to help you out!
2. Private Message (PM) Jen Evers (Admin.) or Penny Jo Ratcliff (Admin.), Lori Ellen (Blog), Pamela Wilber (Card Swaps) or Susan Baker (Moderator)
3. If you are a Patron of Koala T Crafts, you can post your question and the Patron Community will help happily!
4. Jen Evers is always available at her email address: koalatcrafts@gmail.com
Becoming a Patron is so easy and fun!
What is a Patron?
When you make a monthly, or one-time pledge, for as little as a $1.00, you are able to access special videos, additional swaps and challenges like the Envelope Challenge, Sketch Challenge, receive free monthly digital stamps and get a free preview of the crafty items that will be for sale at Koala T Crafts bi-weekly Garage Sales. Just come in your pajamas, hang out and have fun! Your support helps Jen continue her tutorials! Sign up with Patreon!
Remember, great things happen to those that create!
Artistically yours,


| Shop Koala T Crafts Store |
No comments:
Post a Comment