
Coloring Digi for November
Pumpkin Head
This little guy is cute! There are so many ways to create a card using Pumpkin Head! He is a perfect digital stamp for the month of November and the middle of fall!
Preparing to Color
It was decided to print out multiple sizes of Pumpkin Head. For the project, the sizes of 1 1/2", 1 3/4" and 2" diameters were chosen.

The pattern paper that was used helped to pick the colors of Copic markers that would color Pumpkin Head and his friends.
Coloring Pumpkin Head
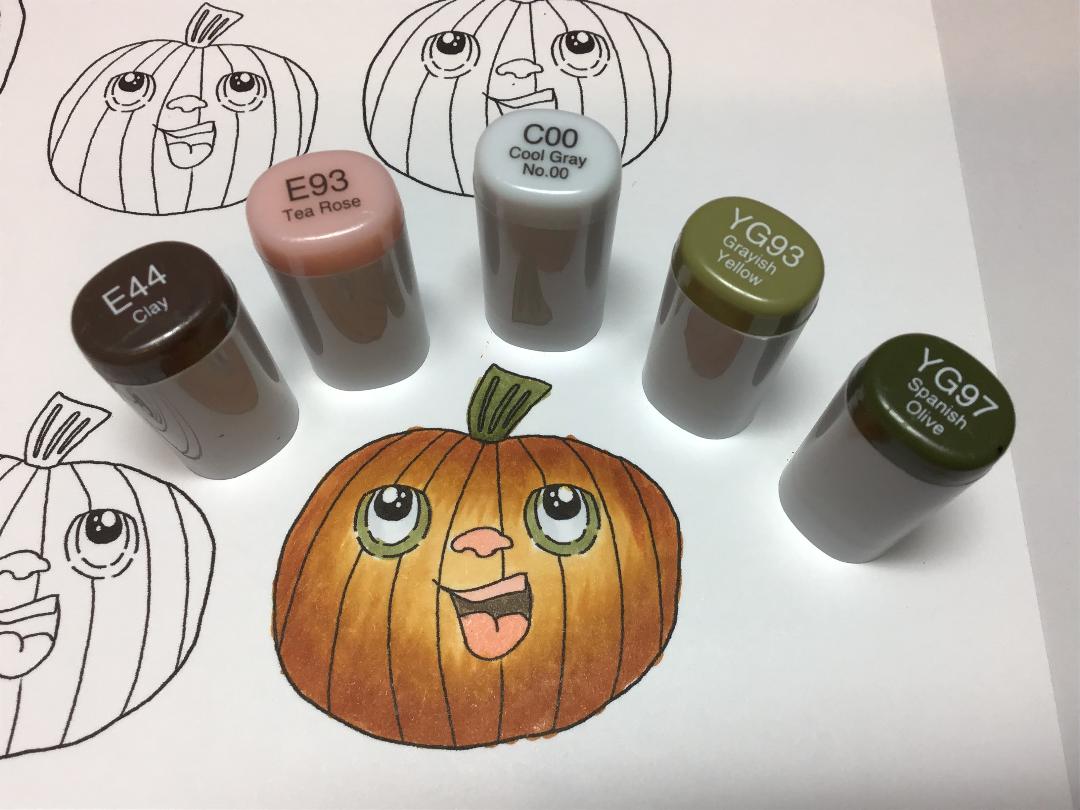
A swatch book was used to choose the colors which came from Authentique's 'Harvest' 6"x 6" paper pad. Swatch books are made by coloring with each marker, usually, within the same color family. A small sample is colored and the name and number are written next to it. This aids in choosing the true color of the marker, not the color that is depicted on the cap.
Using three colors for the first pumpkin, the darkest marker was used first. A quick 'flicking' motion was used to color the area that was not going to be touched by the light source. The medium colored marker was used with the same 'flicking' motion next to the dark marker. Some strokes were overlapped to blend but using the 'tip-to-tip' technique worked better for blending.

To do the “tip to tip” technique, touch the tip of the lighter colored marker to the tip of the darker color marker, thus combining the two colors to create a shade in between. Use the combined color to go over the area where the two colors join on the image. Repeat this process until the image colors are blended as desired. This method creates a less harsh blending of colors and does not damage the tips. It may also be used to substitute for a color marker you may not have.

The stem of Pumpkin Head was colored using YG93 and YG97, blended as needed. Marker E93 was applied for the nose and tongue and roof of the mouth. Marker E44 was used for the inside of the mouth. For the Iris of the eyes, YG93 was used and then C00 on the eyeball to accent the white color in the eye. This finishes the first pumpkin!
The Rest of the Gang
Color combinations in sets of 3, using a combination of dark, mid, and light tone for each image, works best for blending. Nine pumpkins of varying sizes using the color combinations shown in the photo were created, adding the same accent colors from the first pumpkin for the stem and facial features.

They were fussy cut cutting along the black line of the image using Fiskars Cutter Bee scissors. Copic marker N8 was used to go over the outside edge of each image, covering the white edge of the cardstock.

Putting It All Together
A brown sheet of cardstock was cut to 5 1/2" X 8" 1/2 and scored on the 8 1/2” side at 2 1/8” and 4 1/4”. It was then folded on the score lines to form an easel card base.
The following pieces for the card topper were cut as follows:
Brown cardstock 4 1/4” X 5 1/2”
Green cardstock 4 1/8” X 5 3/8”
The designer paper was cut at 4” X 5 1/4”. The corners were rounded with a Creative Memories corner rounding punch.
These three pieces were put together to form the card topper.

The following was cut for the inside of the card:
Green Cardstock 5 1/4” X 4”
White cardstock 3 3/4” X 5”
The two pieces were glued together and put them on the inside of the brown card base that is NOT scored. This will create an area inside the card for a sentiment or message.
The card was laid with the inside face down. This formed the front of the card. Glue was added to the lower 2 1/8” section of the card front. With the edges matched, the top of the card topper was adhered with the designer paper facing up.
The pumpkin friends and Pumpkin Head were laid out on the card topper forming a pyramid. Starting with the bottom row, three pumpkins were adhered. The two on the outside were attached with a tape runner, Pumpkin Head in the center is attached using double-sided foam tape for dimension. The pumpkin stems were left glued to allow the next layer of pumpkins to be tucked underneath.
On the second row, the inside edges of each pumpkin (towards the center of the card) were attached with the double-sided foam tape. The outside edges of the second row of pumpkins were attached using the tape runner. This allows you to “stack” the pumpkins. The top pumpkin was attached using double-sided foam tape.

The Grande Finale
Double-sided foam tape was used to adhere one of the remaining pumpkins to the inside bottom edge of the card. This is the stand to form the easel. As a finishing touch, Glossy Accents was added on the pumpkin's facial features to bring them to life!

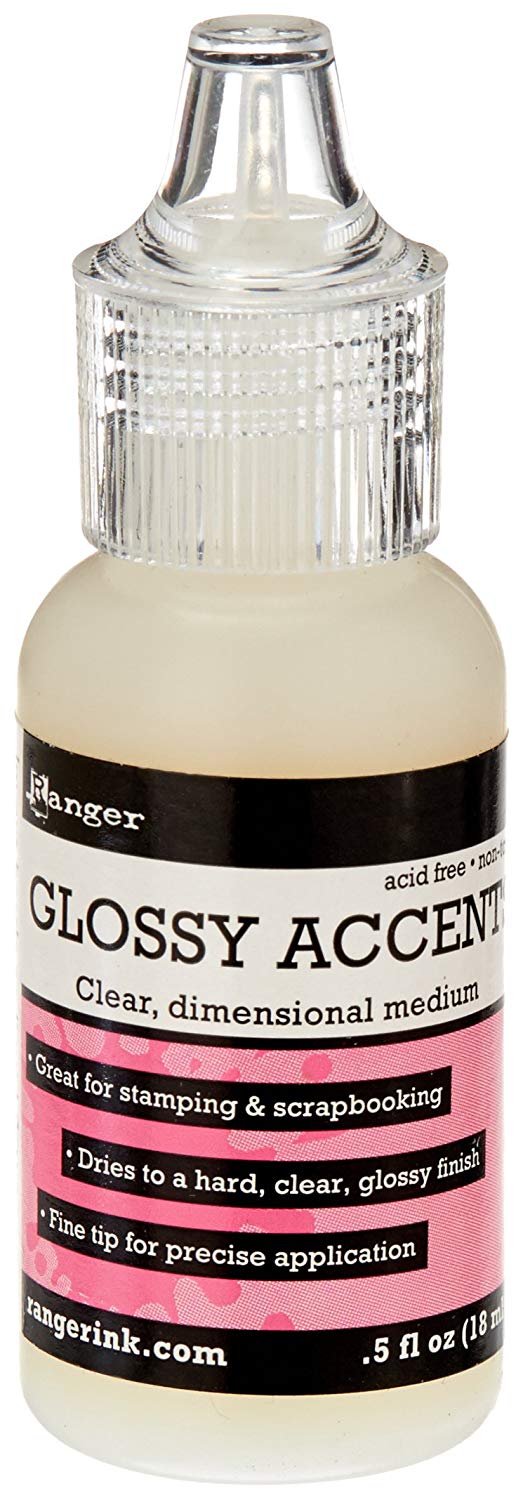 |
Ranger Glossy Accents |
It was a creative idea to make duplicate Pumpkin Heads in varying sizes, to make a stack on the front of the card! It looks cute and very festive!
There are many digital stamps (digis) available in the Koala T Crafts store at koalatcrafts.comhttps://www.koalatcrafts.com/store.html. Check them out! I am sure you'll find one that will be perfect for your next card!
You are personally invited to watch Koala T Crafts LIVE on the YouTube Channel on Wednesday for One in Ten by Jen: from Mailbox to Masterpiece at 5 pm CST. This program is so popular! Viewers enjoy and get a chance to participate! Not only can you chat with the community and Jen but you can send in your scraps and Jen will attempt to make you a card in 10 minutes! She DARES you to stump her!
Then on Fridays at 5 pm CST Koala T Crafts presents Friday Free Play with Jen LIVE! She shows crafting tips and tricks as well as teaching techniques. Viewers can offer ideas and sometimes the show goes a different direction than planned. That's what Free Play is all about!! Having fun while crafting!
Then on every other Saturday from 10 am-2 pm, Koala T Crafts has been offering a Garage Sale for the Facebook Community and the Public!! This too is a LIVE event! You will find discounted prices on tools, stamps, embellishments, markers, Tim Holtz, Stampin´ Up, Close To My Heart, Jolees, Fiskars, and so much more! If you ever have any questions about the events:
Wait! There's MORE!
Patrons have had the chance to get specials or preview sales on the Friday evening before the Garage Sale. After Friday Free Play at 6 pm CST, Patrons, only on the Patron Facebook page, get to view and participate.
How can you get into this sale? It's oh, so easy! Becoming a Patron means making a monthly, or one time pledge, for as little as a $1.00. You are able to access special videos, additional swaps and challenges like the Envelope Challenge, Sketch Challenge, and receive free monthly digital stamps! Just come in your pajama pants, hang out, bring a friend and have fun! Your support helps Jen continue her tutorials! It's easy to sign up with Patreon!
As always, thank you so very much for the continued support of the Jen Evers YouTube Channel! She has hit over 15,000 subscribers! Thank you for supporting and caring about the Koala T Crafts Facebook Group, Patreon Group, and the Blog! Please remember that you can always ask questions;


1. On the Facebook page, many in the Community are willing to help you out!
2. Private Message (PM) Jen Evers (Admin.) or Penny Jo Ratcliff (Admin.), Lori Ellen (Blog), Pamela Wilber (Card Swaps) or Susan Baker (Moderator)
3. If you are a Patron of Koala T Crafts, you can post your question and the Patron Community will help happily!
4. Jen Evers is always available at her email address:koalatcrafts@gmail.com.
Remember, great things happen to
those that create!
Artistically Yours,


Awesome idea,I love how it turned out. thanks for sharing!
ReplyDelete